Gawati as a local installation
If you haven’t yet, please review the Gawati Architecture page: Gawati Architecture.
The below instructions are not specific to an operating system, the components will run on different operating systems.
Note
Pre-requisites (runtime):
- JDK 1.8 LTS - On Linux operating systems you can install OpenJDK8; For Windows and for Mac OSX and Using OS X Homebrew
- NodeJS LTS 8.11.x - See NodeJS LTS 8.11.x. Alternatively you can install NVM (for Linux , Windows ) which lets you easily install parallel versions of NodeJS.
- eXist-db 4.3.0: Download and install eXist-db 4.3.0, see eXist-db Remember to note down the admin password of the eXist-db installation, you will need that later. If you are installing eXist-db on Mac OS X, install it within the User folder, installing it in
/Applicationscauses problems sometimes as the permissions required for eXist-db to write to the file system are for a super user.- Apache HTTPD 2.4.x: Install Apache, on Cent OS, Ubuntu and OS X this will likely be installed by default, on Windows you will have to download and install, see Apache for Windows; enable mod_alias, mod_rewrite, mod_proxy, mod_proxy_http and enable htaccess.
- KeyCloak 3.4.1: Authentication server, provides single-sign-on, see Authentication in Gawati
- RabbitMQ 3.7.6: Message Queue server, used by the content sync engine that moves data between the Gawati Editor System and the Gawati Portal System see installing rabbitmq server, version 3.7.6 you will need to install Erlang 20.3 before that, see installing erlang.
- MongoDB 3.6.5 Community Edition: Used by the Gawati User Profiles system, see Download MongoDB , Install MongoDb
- Jetty 9.4.6.v20170531: Used by Gawati Portal System (NOTE: required, only if you are saving legal documents in XML format), Download , Installing.
- Python 3.6: Used by Gawati Editor System for automatically tagging text (the sub-service is used
gawati-tagit).- Python 2.7: Used by Gawati Editor System for extracting text from PDF files (the sub-service is used
pdf2xml-service).Pre-requisites (development):
- Ant: Download and install Ant
- Visual Studio Code: This is if you want play around with gawati code. Download, and setup Visual Studio Code (there are versions for Windows, OS X and Linux) for development, see VS Code Setup
Table of Contents
You can either build the source from github for each component, or you can install a released version of a component. For getting familiar with the system we recommend starting by installing a released version.
Note
Current Version
- Gawati 1.0.18 download link , released on: 05 July 2018
Older releases, see: Version Compatibility Chart
Installing Gawati Portal
Gawati Portal provides access to all legal and legislative data in the system. See Gawati Portal System for an architecture overview.
IMPORTANT: In Gawati Component interaction is purely via REST services, we use Apache HTTP as a reverse proxy to bind all the services together under one domain and user interface for the user. You may want to read up and get an idea of the Apache configuration before starting the installation. Testing Development & Production modes side by side
Installing Gawati Data
Note
What is gawati-data about ?:
The Gawati Data package provides REST based services to access the XML documents which are stored in the XML database.
For development environments, you should clone the project from Git, and build the package:
1 2 | git clone https://github.com/gawati/gawati-data.git
ant xar
|
Install the gawati-data XAR file into eXist using the eXist package manager in the eXist-db admin dashboard to manually select and install the package (see Installing Packages in eXist-db).
Load Sample Data
Note
The sample data is currently at version 1.14
To understand better how gawati works, we provide you with sample data, which can be loaded into the system and tested. Sample data is provided in two specific parts:
- Xml Documents - which get loaded into the XML database
- PDF and other binary Documents - which are refered to by the XML documents, but served from the file system
We serve PDF and other binary documents from the filesystem to ensure optimal performance.
Download the data sets
Download the XML data set, which is in 2 parts: XML Data set + Full Text Data set (the full text data set is the full text extraction of the PDFs) and the corresponding PDF Data set
Setup the PDF data set
To setup the PDF data-set, you just need to extract the files into a folder, e.g if you extract the PDF files into /home/data/akn_pdf, and add a Apache configuration to serve the folder contents (See Apache configuration for binary data)
Setup the XML data set
To setup the XML data-set, extract the archives into separate folders (e.g. /home/data/akn_xml/akn and /home/data/akn_xml/akn_ft). On Linux and MacOS you can run the following command to get the data input password:
1 | <path_to_exist>/bin/client.sh -ouri=xmldb:exist://localhost:8080/exist/xmlrpc -u admin -P <exist_admin_password> -x "data(doc('/db/apps/gawati-data/_auth/_pw.xml')/users/user[@name = 'gawatidata']/@pw)"
|
Where <path_to_exist> is the path to the eXist-db installation, and <exist_admin_password> is the eXist-db admin password. If you installed eXist on a different port change that in the -ouri setting.
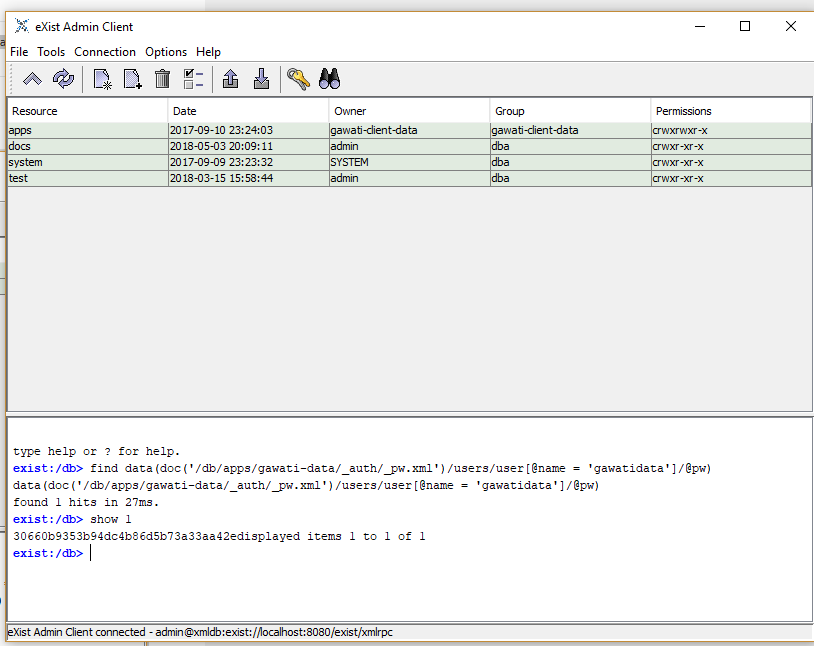
On Windows do the following; Start the eXist-db Client(<path_to_exist>/bin/client.bat). In the command window of the eXist-db client run the following commands:
1 2 | find data(doc('/db/apps/gawati-data/_auth/_pw.xml')/users/user[@name = 'gawatidata']/@pw)
show 1
|
Copy the output password hash as shown below.
Now upload the data using the following command run from the eXist-db folder:
1 2 | ./bin/client.sh -u gawatidata -P <copied_password_hash> -d -m /db/docs/gawati-data -p /home/data/akn_xml_docs_sample
./bin/client.sh -u gawatidata -P <copied_password_hash> -d -m /db/docs/gawati-data -p /home/data/akn_xml_ft_sample
|
On Windows you will run it as :samp:.\\bin\\client.bat instead:
1 2 | .\bin\client.bat -u gawatidata -P <copied_password_hash> -d -m /db/docs/gawati-data -p d:\data\akn_xml_docs_sample
.\bin\client.bat -u gawatidata -P <copied_password_hash> -d -m /db/docs/gawati-data -p d:\data\akn_xml_ft_sample
|
Note
- the current folder structure expected within
/db/docs/gawati-datais/db/docs/gawati-data/aknfor the XML files and/db/docs/gawati-data/akn_ftfor the full text files. - if you get a password failure, log in to eXist-db as admin, and reset the password for gwdata user manually, and then use that password.
Finally Rebuild the Database Index
1 2 | $curl http://localhost:8080/exist/apps/gawati-data/post-data-load.xql
<success>Build Sort index</success>
|
Apache Config
There are Apache HTTP configs required for both serving XML and PDF documents. See Apache configuration for gawati data services and Apache configuration for binary data
Development
We recommend using Oxygen XML for developing on eXist-db. VSCode can also be used (see Using VS Code with eXist DB).
Accessing eXist-db via SSH tunnelling
If eXist-db is installed in a remote server, by default the server starts on port 8080 and listens only to localhost. To access the web-based dashboard from a remote computer, you need to use ssh tunneling. For example, if your remote server is on the I.P. Address 101.102.103.104, and eXist-db is on port 8080, running the following command, will give you access to the eXist-db dashboard on http://localhost:9999 :
1 | ssh -vv -i <path to private key> -p 22 -L 9999:127.0.0.1:8080 server_user@101.102.103.104
|
Installing Gawati Portal UI
Extract the contents of the zip file onto a directory served by Apache.
But, if installing for development, clone from git and build:
1 2 | git clone https://github.com/gawati/gawati-portal-ui.git
npm install
|
And add the corresponding Apache Server configuration entry (See Apache configuration for portal-ui).
The React app in the https://gitlab.com/bungenicom/gawati/gawati-portal-ui repository can be used to run different clients. The configuration and set up scripts for the presently available clients: ecowas and gawati are available in separate git repositories.
1 2 | git clone https://gitlab.com/bungenicom/gawati/portal-ui-config
git clone https://gitlab.com/bungenicom/ecowas/portal-ui-config
|
Switching clients
In order to switch clients during development:
Checkout to the <client>/portal-ui-config repository and pull latest.
- Check proxy setting in
- package.json
- portal-ui-config/proxy.js.
Change following values in .env and .env.development files accordingly:
REACT_APP_THEME=default
REACT_APP_CLIENT=gawati
REACT_APP_CONFIG_PATH=../../gawati-portal-config
Restart portal
Note
REACT_APP_CONFIG_PATH points to the client config repository. The path is relative to the scripts folder in gawati-portal-ui repository.
Note
A theme can only be associated with a specific client. A client may have a choice of multiple themes.
Development and Production mode
See our detailed guide on setting up your environment for production and development mode testing Testing Development & Production modes side by side.
For setting up Authentication, click here: Authentication
Installing Gawati Portal FE
Extract the contents of the zip file into any directory.
For development environments, clone from git and install it:
1 2 | git clone https://github.com/gawati/gawati-portal-fe.git
npm install
|
The Gawati Portal has two runnable components, the portal http server which provides access to REST services, and a cron component that runs scheduled tasks periodically.
Environment Variables
The server can be customized with various envirobment variables which can be specified as prefixes to the service startup.
- WITH_CRON - setting WITH_CRON=1 starts the server with the cron, so there is no separate process for the cron. This is not recommended for production use.
- WITH_CLIENT - setting WITH_CLIENT=1, the server provides the portal-ui client on the /v2 virual directory (instead of Apache doing it). The client is expected to be in the client/build sub-directory.
- HOST - allows setting the host name or address which the server binds to, default is 127.0.0.1.
- PORT - allows setting the port on which the server listens to, default is 9001.
- API_HOST - allows setting the host address to the gawati-data server, default is localhost
- API_PORT - allows setting the port number to the gawati-data server, default is 8080
Configuring KeyCloak Auth
Follow the installation steps from Installing Keycloak.
Within the
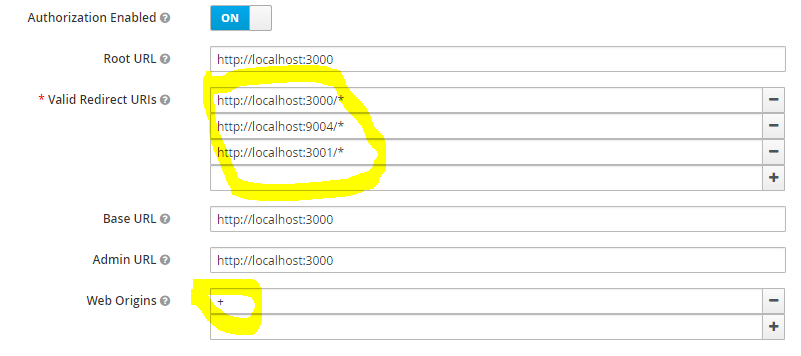
auth.gawati.localrealm, navigate to theClientstab. Click ongawati-portal-ui. Set the other parameters as shown below. In this case we have set the root url, valid url etc to http://localhost:3000 which is the dev mode host and port for Gawati Editor UI. If you are deploying on a domain e.g. http://www.domain.org you can set it to that domain. Note theRedirect URLscan be set to multiple urls, this is because, the profiles services typically runs on a different url base .e.g. a different domain than the portal, so the authentication headers need to support such redirects, and unless each of the redirect domains ( for the portal-ui and for the profiles system) are set here, then the authenticated redirect will fail. You can setWeb Originsto+which tells KeyCloak to set valids CORS headersRedirect Urls.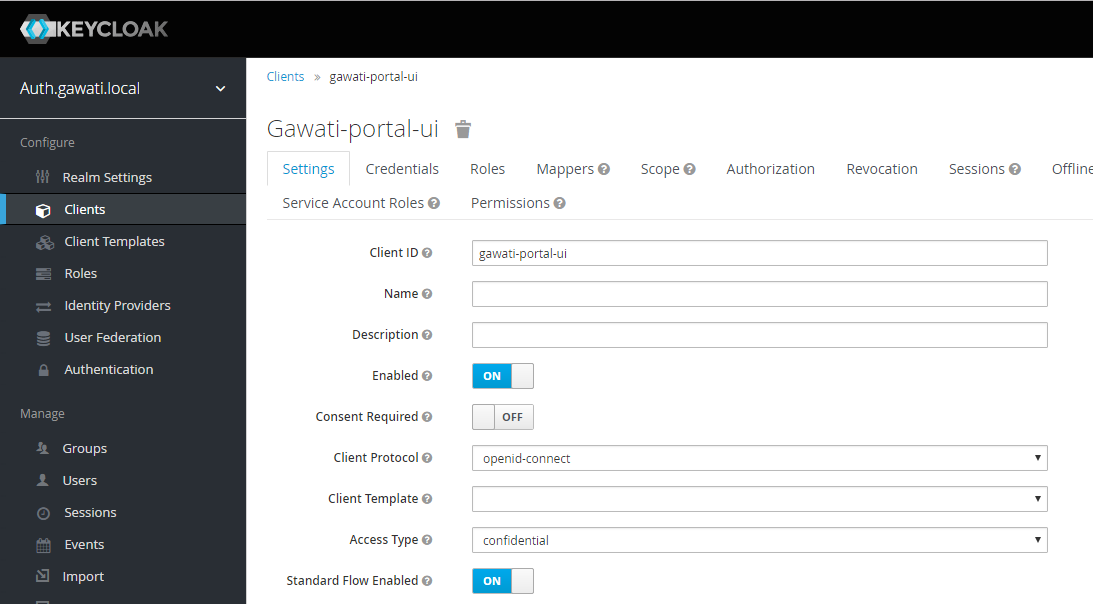
Within the client config, switch to the
Credentialstab and regenerate the secret.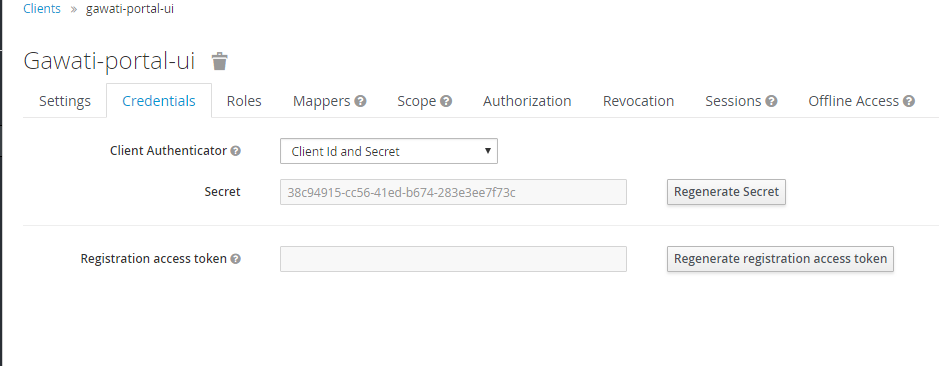
Switch to the
Installationtab in the client section, and choose the format asKeyCloak OIDC JSON. Download the json file.Open the dowloaded json file using your preferred text editor. Copy the variables
auth-server-urltourlandresourcetoclientId. It should look similar to the json shown below.1 2 3 4 5 6 7 8 9 10 11 12 13 14
{
  "realm": "auth.gawati.local",
  "auth-server-url": "http://localhost:11080/auth",
  "url": "http://localhost:11080/auth",
  "ssl-required": "external",
  "resource": "gawati-portal-ui",
  "clientId": "gawati-portal-ui",
  "credentials": {
    "secret": "b344caaa-7341-479f-81b7-9d47aa3128dc"
  },
  "use-resource-role-mappings": true,
  "confidential-port": 0,
  "policy-enforcer": {}
}
Copy the downloaded
keycloak.jsoncontents into thegawati-portal-fe/configs/auth.jsonfile on the portal-fe installation (see Installing Gawati Portal FE.Finally, login as admin into KeyCloak and create some users. You can create a test users like portaladmin, portaleditor, portaluser and associate them with the groups portalui.Admins, portalui.Editors and portalui.Editors .
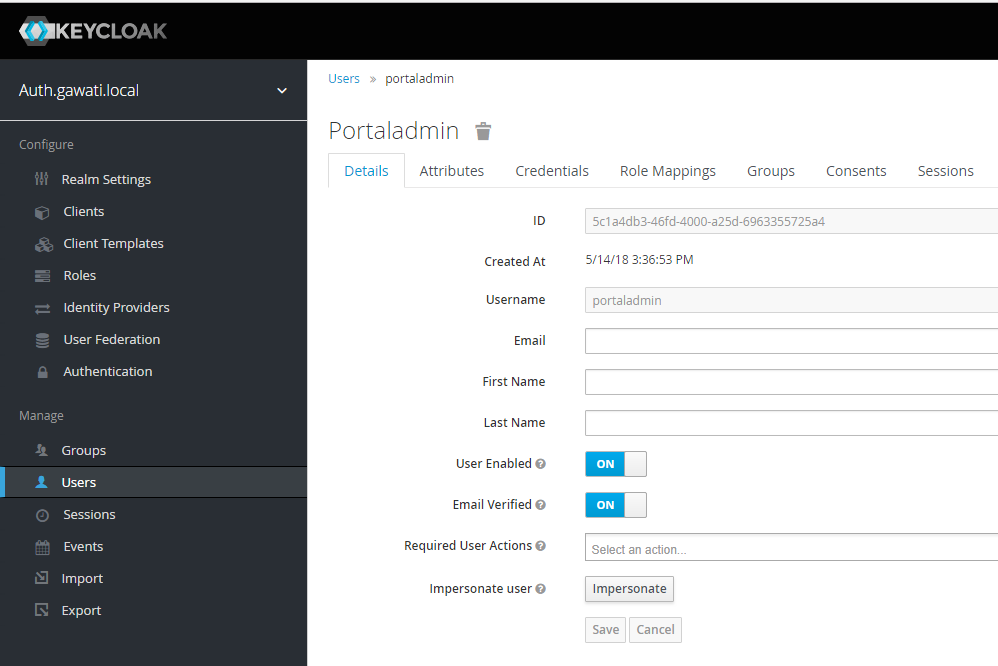
Above: a user called
portaladminhas been added.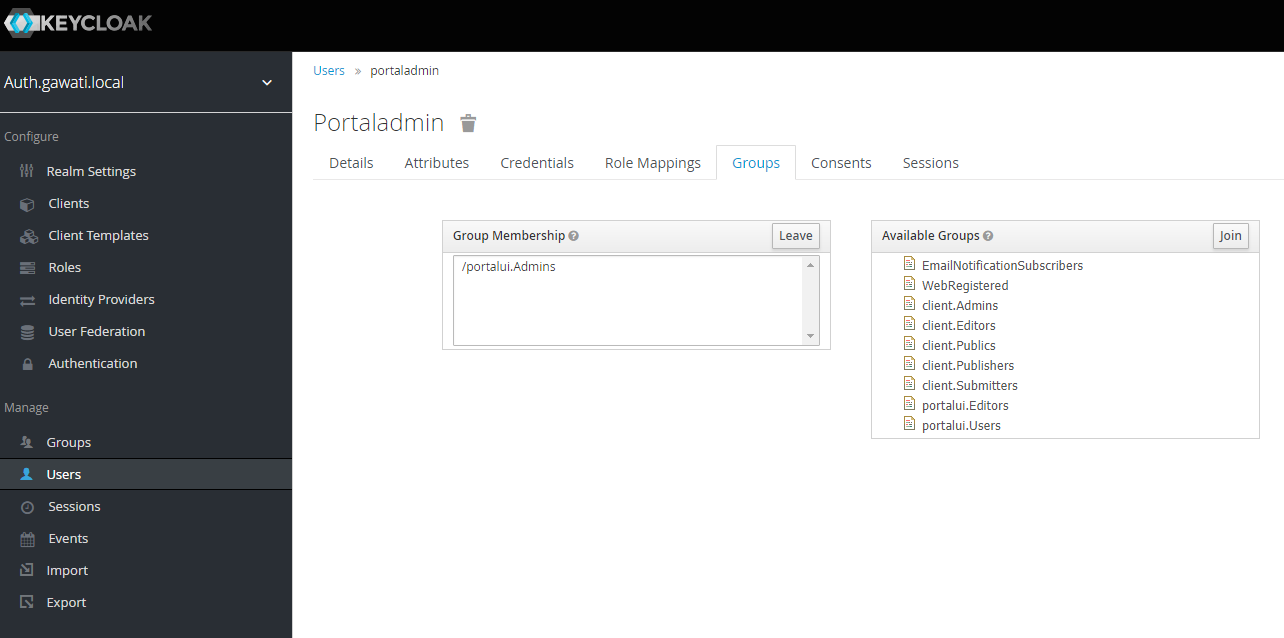
Above: the user has been added to the
portalui.Adminsgroup to give it theportalui.Adminrole.
Starting up Services
All the primary components and services need to be started in a specific order because of interconnected dependencies.
The recommended order is as follows:
- Base Services
- KeyCloak
- eXist-db
- MongoDB
- RabbitMQ
- Component Services
Installing Gawati Viewer Service
Extract the contents of the zip file into any directory.
For development environments, clone from git and install it:
1 2 | git clone https://github.com/gawati/gawati-viewer-service.git
npm install
|
The Gawati Viewer services are invoked by the gawati-viewer npm package. The service can convert XML/DOCX to HTML
Running the REST service
Run the following in the extracted folder to setup the server:
Assuming you extracted the portal server into : /home/web/gawati-viewer-service, from that folder, run :
1 | node ./bin/www
|
Installing Gawati Profiles
Gawati Profiles allows authenticated users in system to have a profile with their personal information. The Profiles system supports other functionality in the system, like allowing logged in users to save their searches. The profiles system is made up of 3 different components:
- MongoDB (as mentioned earlier as a pre-requisite)
- profiles-ui - front-end component
- profiles-fe - back-end component
Setting up profiles-fe
Extract the contents of the zip file into any directory.
For development environments, clone from git and install it:
1 2 | git clone https://github.com/gawati/gawati-profiles-fe.git
npm install
|
Run the following in the app folder to setup the server:
1 | npm install
|
From that folder, run… :
1 | npm start
|
…to start up the web-service. By default it starts on PORT 9003. You can change that by running it as:
1 | PORT=11003 npm start
|
Installing Gawati Profiles UI
Extract the contents of the zip file onto a directory served by Apache.
But, if installing for development, clone from git and build:
1 2 | git clone https://github.com/gawati/gawati-profiles-ui.git
npm install
|
And add the corresponding Apache Server configuration entry (See Apache configuration for profiles-ui).
Installing Gawati Data Editor
Gawati Data Editor (or Gawati Editor in short), is a tool that allows inputting managing documents in the portal. Gawati is a suite of distributed applications, and the same model applies here for data entry. The Gawati Portal System has been conceived has a public facing system to access and search for data. The Gawati Editor is a back-office systme that allows managing the process of entering data and publishing it online.
Gawati Editor can be used independent of the Gawati Portal System, as it has its own working-data store and workflow, and information is published onto the Gawati Portal System via a asynchronous message queue.
The Gawati Editor is composed of different components: Editor UI, Editor Server component, Editor Data services(an eXist-db component), and authentication integration component.
See Gawati Editor System for an architecture overview.
Setting up the Editor UI
To install the Editor UI Component in development environments:
Install packages
1
npm install
In case of error during the above step, please refer to https://stackoverflow.com/a/39648550 on instructions on how to resolve the issue
Setting Up the Editor FE (Server Component)
To install the Editor Server Component in development environments:
Install packages
1
npm install
Installing Gawati Editor BE (Data services Component)
Download sample data from here: Client Sample data (XML), Client Sample data (PDF)
Build to get the package.
1
2
cd gawati-client-data
ant xar
The above generates gawati-client-data-1.x.xar package in the
buildfolder. Install it using the Package Manager in the eXist-db admin dashboard to manually select and install the package (see Installing Packages in eXist-db). Alternatively, here is a video that shows how to install a package in eXist-db:Extract and load the Client Sample data (XML). In eXist’s dashboard -> Collections, create the path
/db/docs/gawati-client-data.Now upload the data using the following command run from the eXist-db folder:
1
./bin/client.sh -u gawati-client-data -P <gawati-client-data_password> -d -m /db/docs/gawati-client-data -p <path_to_extracted_data>/gawati-client-data
or on windows:
1
.\bin\client.bat -u gawati-client-data -P <gawati-client-data_password> -d -m /db/docs/gawati-client-data -p <path_to_extracted_data>\gawati-client-data
the user here is
gawati-client-datawhich is the user with permissions over the/db/docs/gawati-client-datacollection where we are storing the xml documents. The password for this user is generated during installation and stored in the/db/apps/gawati-client-data/_auth/_pw.xmlfile. The same instructions are shown in the video below.
- Make the necessary Apache conf entries. See Apache configuration for gawati client.
Configuring KeyCloak Auth
Follow the installation steps from Installing Keycloak.
Within the
auth.gawati.localrealm, navigate to theClientstab. Click ongawati-client. Set the other parameters as shown below. In this case we have set the root url, valid url etc to http://localhost:3000 which is the dev mode host and port for Gawati Editor UI. If you are deploying on a domain e.g. http://www.domain.org you can set it to that domain.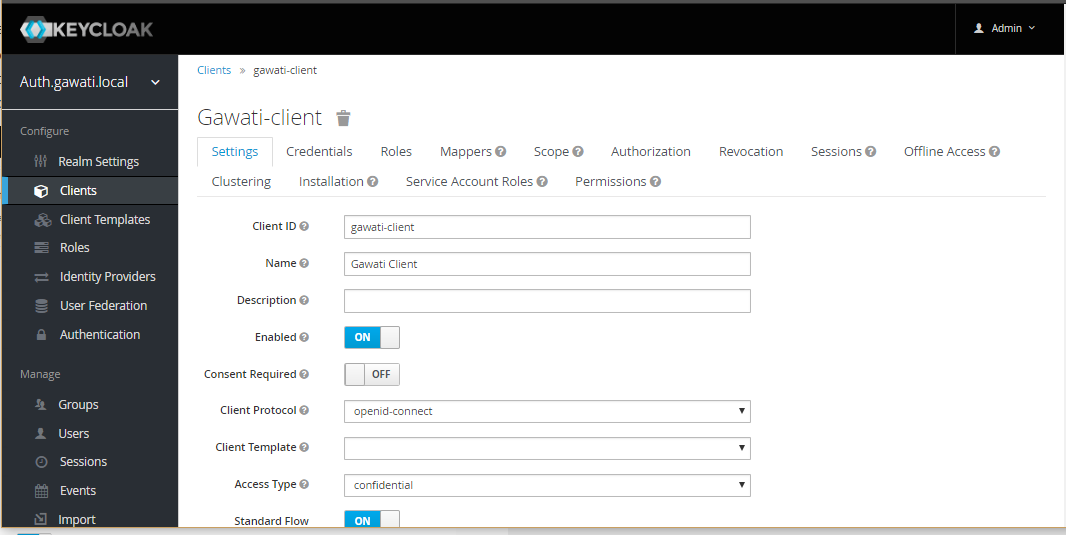
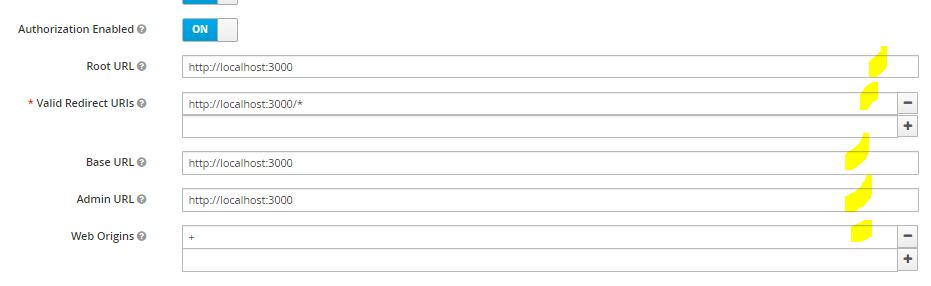
Within the client, switch to the
Credentialstab and regenerate the secret.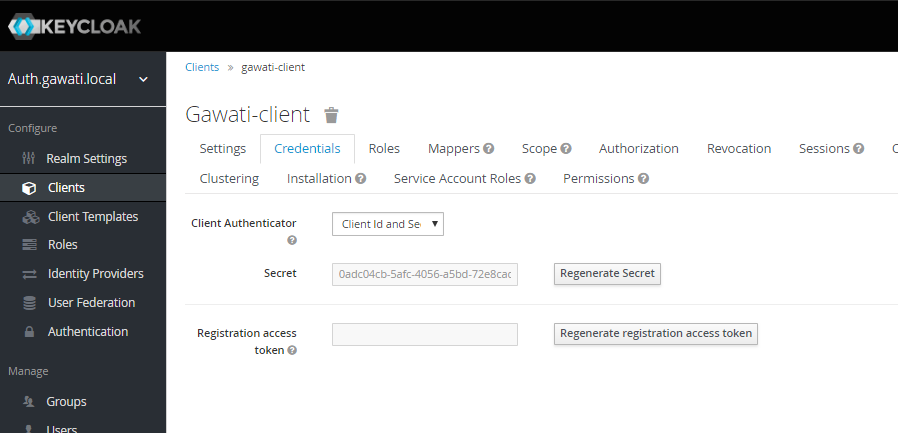
Switch to the
Installationtab in the client section, and choose the format asKeyCloak OIDC JSON. Download the json file.Open the dowloaded json file using your preferred text editor. Copy the variables
auth-server-urltourlandresourcetoclientId. It should look similar to the json shown below.1 2 3 4 5 6 7 8 9 10 11 12 13 14
{
  "realm": "auth.gawati.local",
  "auth-server-url": "http://localhost:11080/auth",
  "url": "http://localhost:11080/auth",
  "ssl-required": "external",
  "resource": "gawati-client",
  "clientId": "gawati-client",
  "credentials": {
    "secret": "b344caaa-7341-479f-81b7-9d47aa3128dc"
  },
  "use-resource-role-mappings": true,
  "confidential-port": 0,
  "policy-enforcer": {}
}
Copy the downloaded
keycloak.jsoncontents into thegawati-editor-fe/auth.jsonfile on the editor-fe installation (see Setting Up the Editor FE (Server Component).Finally, login as admin into KeyCloak and create some users. You can create test users like submitter, editor, admin and associate them with the groups client.Submitters, client.Editors and client.Admins .
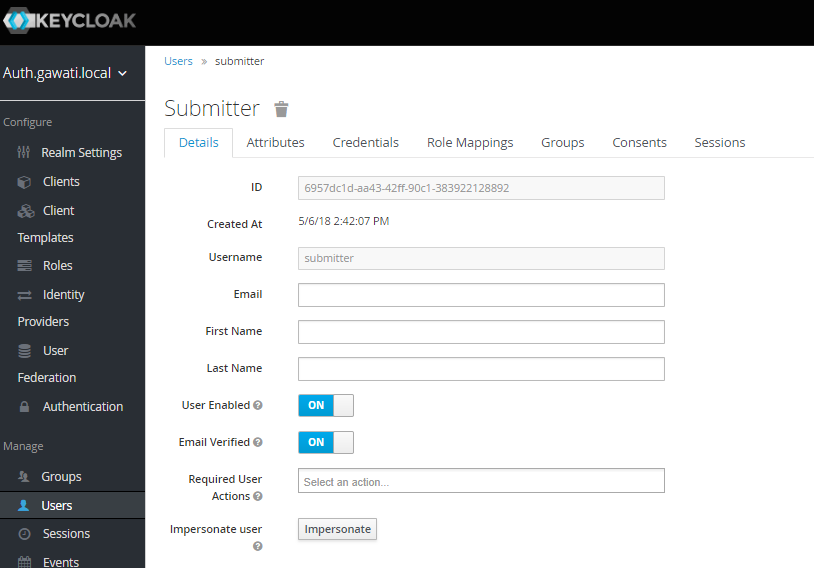
Above: a user called
submitterhas been added.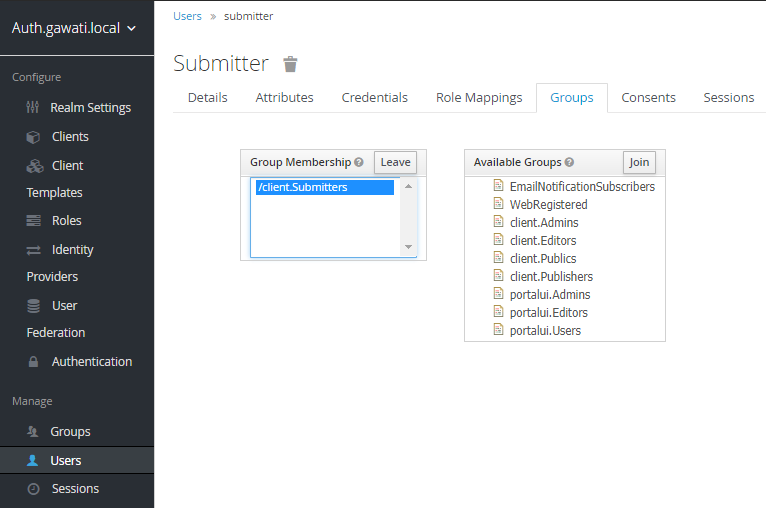
Above: the user has been added to the
client.Submittersgroup to give it theclient.Submitterrole.
Run Gawati Editor
Start eXist
Start keycloak
1
2
cd keycloak-3.4.3.Final
./bin/standalone.sh
Start gawati-editor-fe service. Use the
dev_npm_startscripts to start the service in development node.1 2
cd gawati-editor-fe ./dev_npm_start.sh # .\dev_npm_start.bat on windows
Start gawati-editor-ui
1
2
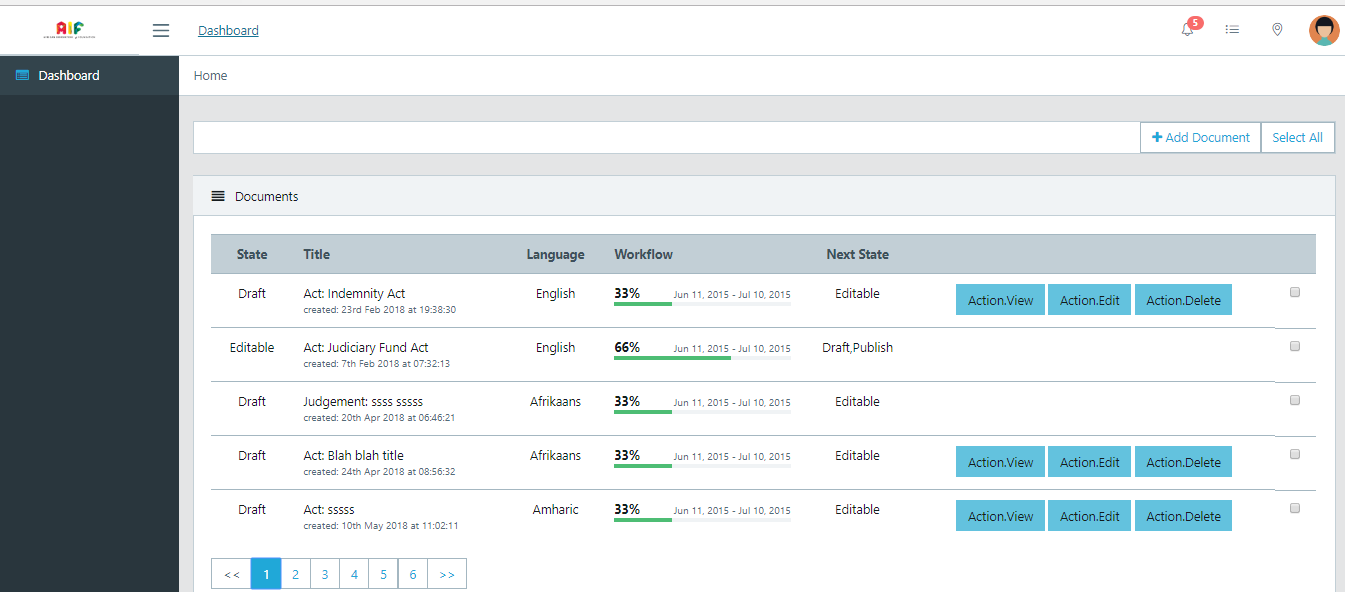
cd gawati-editor-ui
npm start
Load http://localhost:3000 in the browser. You should see a login screen. Login with any of the users you created.
Above: Login screen for gawati-editor
After logging in, you should be able to see the dashboard with some sample documents.