Authentication in Gawati
Table of Contents
Introduction
Authentication in Gawati is handled by a separate component service called KeyCloak. Keycloak is a solution for Identity Management (IDM) and Single Sign On (SSO); See KeyCloak .
- Keycloak has the following components:
- Keycloak server – an authentication server to store the user information and used to get the access token.
- Keycloak adapter – It is a componenet which help us to integrate keycloak in the existing application.
It needs to be installed and integrated to work with Gawati. For an overview of how KeyCloak works in Gawati, see How Trust & Security Works in Gawati
Installing & Configuring KeyCloak for Production
Setup
The following instructions deploy keycloak behind an Apache reverse proxy and SSL.
Download KeyCloak 3.4.3 Final and unzip into the /opt folder. (We are assuming these commands are run as root)
cd /opt
wget https://downloads.jboss.org/keycloak/3.4.3.Final/keycloak-3.4.3.Final.zip
unzip keycloak-3.4.3.Final.zip
Add a user for keycloak called keycloak, and change the ownership of the unzipped files to this user.
sudo chown keycloak: -R keycloak-3.4.3.Final
Add a keycloak
adminto/opt/keycloak-3.4.3.Final/standalone/configuration/keycloak-add-user.json.# run this in /opt/keycloak-3.4.3.Final if you are not already there # run ``su keycloak`` to run this as the ``keycloak`` user ./bin/add-user-keycloak.sh --user admin --password <set an appropriate password> --realm master
Modify
standalone/configuration/standalone.xmlto enable proxying to Keycloak:Run these 3 commands as the
keycloakuser:# enable proxy forwarding, we need to forward traffic from port 8443 the secure port of keycloak to port 443 on Apache ./bin/jboss-cli.sh 'embed-server,/subsystem=undertow/server=default-server/http-listener=default:write-attribute(name=proxy-address-forwarding,value=true)' # add the redirect-socket attribute to enable https proxy forwarding ./bin/jboss-cli.sh 'embed-server,/subsystem=undertow/server=default-server/http-listener=default:write-attribute(name=redirect-socket,value=proxy-https)' # enable forwarding to port 443 ./bin/jboss-cli.sh 'embed-server,/socket-binding-group=standard-sockets/socket-binding=proxy-https:add(port=443)'
Add a service startup config
keycloak.servicefor systemd to start keycloak as a service:[Unit] Description=KeyCloak After=network.target [Service] Type=idle User=keycloak Group=keycloak ExecStart=/opt/keycloak-3.4.3.Final/bin/standalone.sh -b 127.0.0.1 TimeoutStartSec=600 TimeoutStopSec=600 [Install] WantedBy=multi-user.target
Now enable the service:
systemctl daemon-reload
systemctl start keycloak.service
Now check if the service is running:
systemctl status keycloak.service
Now add the appropriate configuration to apache.
<IfModule mod_ssl.c>
<VirtualHost *:443>

    ProxyRequests off
    ServerName auth.xyz.com
    ServerAlias auth.xyz.com

    ErrorLog ${APACHE_LOG_DIR}/error_auth.log
    CustomLog ${APACHE_LOG_DIR}/access_auth.log combined

    ProxyPreserveHost On
    ProxyPass / http://localhost:8080/
    ProxyPassReverse / http://localhost:8080/

    RequestHeader set X-Forwarded-Proto "https"
    RequestHeader set X-Forwarded-Port "443"

    SSLCertificateFile /etc/letsencrypt/live/auth.xyz.com/fullchain.pem
    SSLCertificateKeyFile /etc/letsencrypt/live/auth.xyz.com/privkey.pem
    Include /etc/letsencrypt/options-ssl-apache.conf
</VirtualHost>
</IfModule>
Note
If you only wish to install and test the system, See Setup. Here we created the SSL Certificates using
letsencrypt. Instructions for setting up signed SSL Certificates can be found here:
- On Ubuntu 16.04
- On CentOS 7
Installing the Gawati Theme
KeyCloak is themed independently of Gawati.
Download the `gawati keycloak theme <https://github.com/gawati/gawati-keycloak-theme/releases/download/1.0.0/gawati-keycloak-theme-1.0.0.zip>`_images
Go to the
themesfolder, and extract the gawati theme into a folder calledgawati.Navigate to
standalone/configuration/standalone.xmland add, a<welcomeTheme>with the valuegawati.<theme> <staticMaxAge>2592000</staticMaxAge> <cacheThemes>true</cacheThemes> <cacheTemplates>true</cacheTemplates> <welcomeTheme>gawati</welcomeTheme> <dir>${jboss.home.dir}/themes</dir> </theme> .. note:: You can set ``cacheThemes`` and ``cacheTemplates`` to ``false`` for development purposes
Change the
Display Nameand theHTML Display Name
Installing & Configuring KeyCloak for Development
Prerequisites
- Java 8 JDK
- zip or gzip and tar
- At least 512M of RAM
- At least 1 GB of diskspace
Installation Steps
Install the Java 8 JDK
Visit http://www.keycloak.org/downloads.html and download KeyCloak 3.4.3 Final.
Unzip this and navigate to the
bindirectory.Note
To prevent KeyCloak from hanging due to lack of available entropy, change the jvm to use
urandominstead ofrandom:- Open the
$JAVA_HOME/jre/lib/security/java.securityfile in a text editor. - Change the line:
- Change the entry
securerandom.source=file:/dev/randomto read: securerandom.source=file:/dev/urandom; Save your change and exit the text editor.
- Change the entry
- Open the
Run
standalone.sh(or in windowsstandalone.bat). By default it starts on port 8080. You should change the default port as it clashes with the default ports of eXist-db. You will need to do that in standalone/configuration/standalone.xml.<socket-binding-group name="standard-sockets" default-interface="public" port-offset="${jboss.socket.binding.port-offset:0}"> ... <socket-binding name="http" port="${jboss.http.port:11080}"/> <socket-binding name="https" port="${jboss.https.port:11443}"/> ... </socket>
Restart the service and visit the link :
http://localhost:11080Click on the administration console. Login with the admin and admin.
Generate a new development realm using the command:
1
2
3
cd gawati-keycloak-scripts
npm install
node index.js --new_realm_name=auth.gawati.local --input_realm=model_realm/model-realm.json --output_file=auth.gawati.local.json
Switch back to the administration console of KeyCloak in the browser
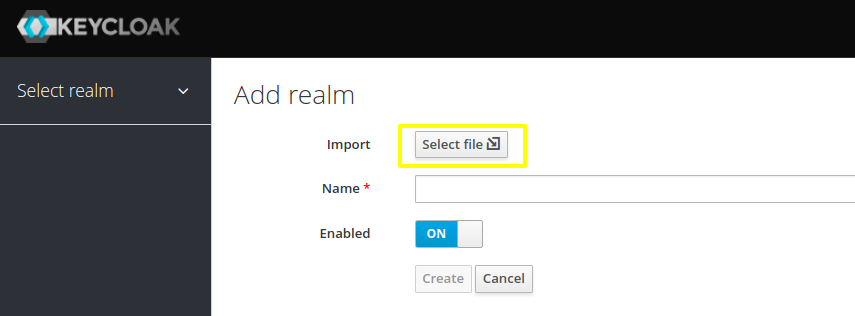
Create a dev realm by importing configuration from auth.gawati.local.json generated above.
Configuring Single Sign-on across different applications
In Gawati single-sign-on (SSO) is provided via KeyCloak.
Functionally it works in the following way – you login into an application (e.g. the Portal), and that automatically logs you into other Applications which have been configured for SSO like the Profiles application.
The setup for such SSO aware applications is very easy.
You just need to make use of the same KeyCloak JSON configuration file to initialize their authentication environments.
You need to configure the client setup in KeyCloak associated with the KeyCloak JSON file to recognize multiple redirect urls. For example, if your portal is being served on
http://www.domain.organd your profiles application is onhttp://profiles.domain.org, you need to initialize both with the same KeyCloak file, and sethttp://www.domain.org/*andhttp://profiles.domain.org/*as valid redirect URIs in KeyCloak. In the figure below, is an example where redirect URIs have been set tohttp://localhost:3000&http://locahost:3001andWeb Originshas been set to+. This kind of setup allows you to login tolocahost:3000and move on tolocahost:3001as if you had already authenticated on it.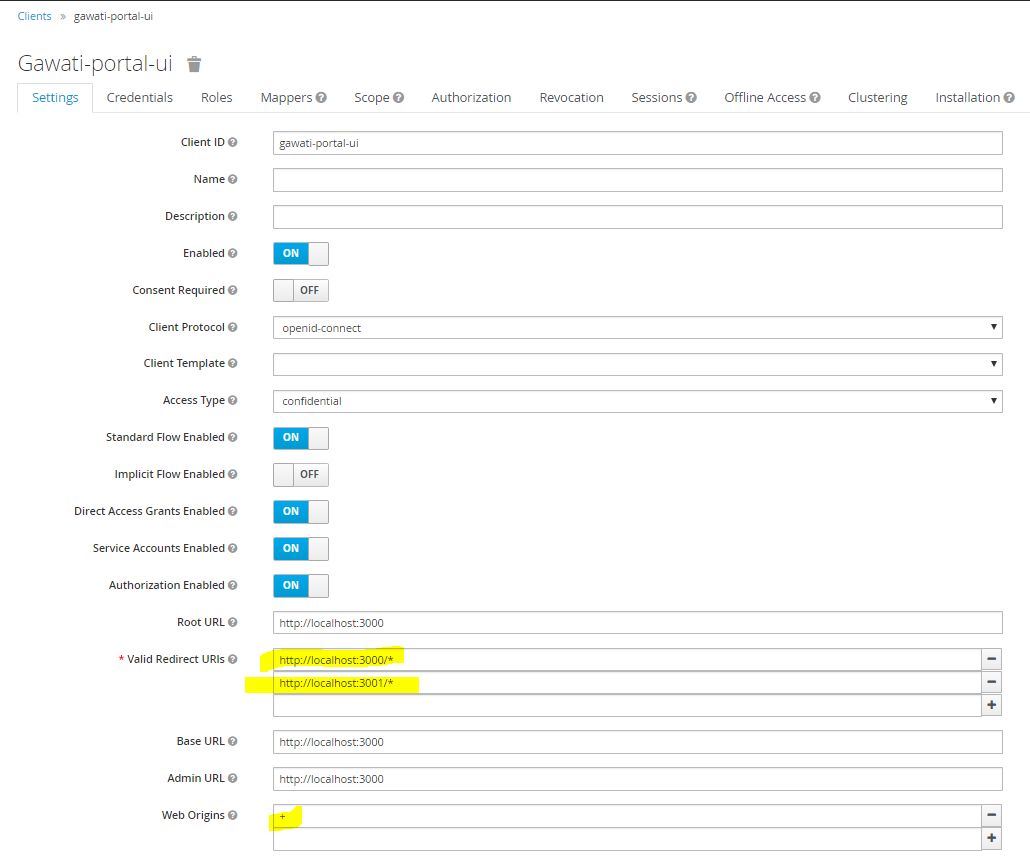
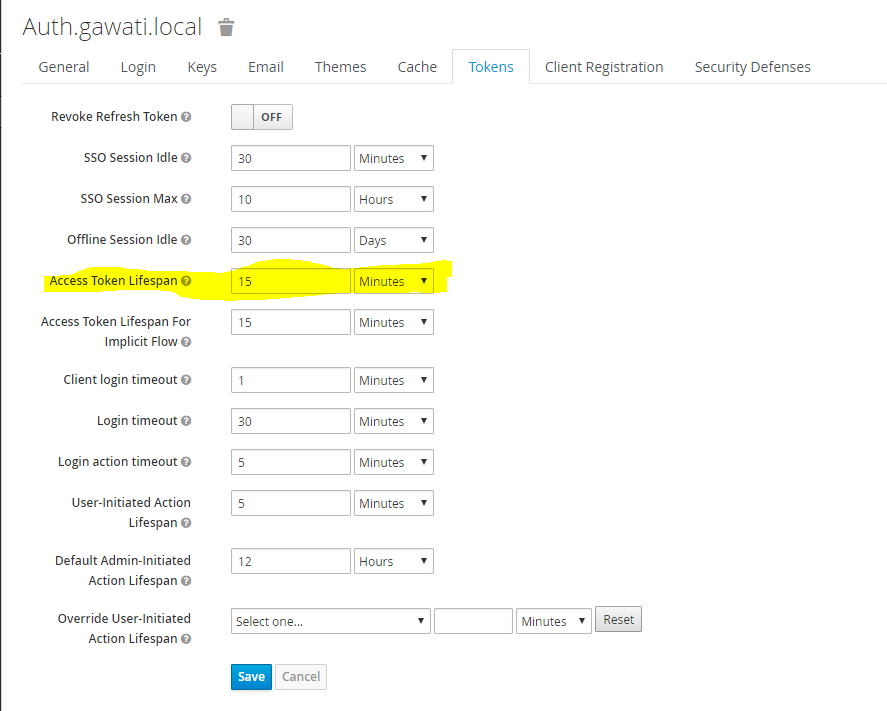
A note on access tokens
KeyCloak uses 2 tokens - one on the client-side and one on the server side. The client side periodically requests the server to update its server-side token. The validity of the server-side token is recommended to be 15 minutes and should be set as below, in Realm Settings->Token.